Thursday, December 20, 2012

Merry Christmas and a free printable (The True Meaning of Christmas)

 
Merry Christmas blog readers!
 
First off I want to start out by saying how incredibly grateful I am and how blessed my family has been this year. I knew that this year would be a year of sacrifices. After quitting my job a year ago and deciding to spend more time at home with the kids while they were still so young, we had to make a few changes to our budget. My paychecks, though they weren't much, were a lot of our "fun" money. Date nights, lunches with daddy during the week, quilting supplies and even vacation money. There have been many times this year when I had to explain to the kids that we "just couldn't right now" and to be grateful for what they have (not a bad conversation to have, just a tiring one). As the holidays were getting closer we got a blow to our pocket books and sat down with the kids to explain that it would be a small Christmas this year.
 
Shortly after this conversation with the kids, my husband, who is an attorney, got an unexpected and very surprising offer from a law firm who wanted him to start work for them around the new year. My husband has always had a good job that we have been very grateful for, but there wasn't a whole lot of opportunity for growth and he was feeling pretty stuck. That was our first Christmas surprise.    
 
 
(The kids in the lobby of daddy's new office)
 
We were blessed with a second surprise by the way of a paycheck bonus that came just in time and was very much needed. It was enough to clear some debts and buy some Christmas gifts. We could have our typical large Christmas after all... but we're choosing not to.
 
 
(Moving into daddy's new office)
 
Ok I admit, I did run out and buy a couple things for the kids and I will be giving my husband a Christmas gift this year after all, but this holiday season I've listen to my children discuss amongst themselves  how Santa has a lot of needy children he has to get presents for and we have plenty. The other day my son (who doesn't really "believe" in Santa anymore, but likes to pretend anyway) was telling his little sisters that there are children who are only getting things like socks and shoes for Christmas because they need them, so we should be grateful we are getting a toy.
 
There is no way I'm going to ruin this Christmas of sacrifice and appreciation for my children!
 
 
(This years Christmas pajamas for the girls. A gown for them and one for their doll. I found the pattern in THIS BOOK. Check to see if your local library has it... that's what I did)
 
My husband has always had work these past 6 years, he has always brought home a steady paycheck, and I willing quit my job to spend more time with my children, knowing that it maybe a tight but we could make due. We have worked hard and prayed hard that he would find opportunities to advance in his career and now he finds himself working at a great new firm with lots of exciting things in store for 2013. We have been so blessed.
 
I sincerely hope that all of you can find the gratitude and blessing that I have this season. But I know from some of our past Christmas things can be particularly scary this time of year. For those of you out there who are also having a small Christmas this year I hope you find peace and faith knowing that it will not last forever, you do not know what the future holds and the most memorable blessing usually come in the darkest hour.  
 
This Christmas we will focus more on Christ as we talk to the kids about the true meaning of Christmas. To help them remember, I've made up these little candy bags to place in their stockings.


Each candy represents a reminder about Christ and his love for us. You can save and print off a copy of my bag toppers below...


Merry Christmas friends and a Happy and Hopeful New Year!

Saturday, December 8, 2012

Kids Craft, Owl Pinecone Ornament

 
I first saw this idea HERE and thought it was so cute!
 
One afternoon while the kids were home from school we headed to the park and gathered pine cones. Most of the pine cones we found were still closed, but did you know you can force pine cones to open up for you in the oven? I placed my pine cones on a cookie sheet in a 200 degree oven and they slowly opened up. It took about 3 hours for them to fully open. It also drys the sap and gets rid of any bugs that might be hiding among your pine cones.

 
I created the little Santa hats with hot glue and fabric scraps and the owl eye from paper. Some large googly eyes would be super cute too.


I let the kids put the rest of the owl together themselves. A bit of ribbon hot glued to the back creates the hanger for the Christmas tree.


Friday, November 30, 2012

New twist on an old favorite

 
I've made this table topper 3 different ways so far. I love the shape and it comes out perfect every time. It's from the book On The Run by Anka's Treasures. I definite good buy!
 
 
It's the perfect use for a charm pack, or my the case of this table topper... leftovers from a quilt I made a few years ago.

 
I just added a fat quarter of the Santa print from this year and it feels brand new again.

 
I especially love the little Santa's peeking out here and there from the border.


Wednesday, November 28, 2012

Our Home For The Holidays - And Free Printable!

 
I Love my home this time of year! Even sitting in the evening watching TV feels special when the only light in the room comes from the tree. Here is a few pictures of our budget friendly holiday decorations...
 
 I needed new printables for my side table this Christmas and this is what I came up with...
 
 
The printables are cute but I especially love my little 8$ white tree from Target! 
You can find a link to these printables of mine at the end of this post. Enjoy!
 
I love to hang our stockings on the stairs (since we don't have a mantle) so it's the first thing the kids see as they head down Christmas morning. Seeing there stockings stuffed with goodies will only highten the excitement for when they turn the corner and see the real jackpot... under the Tree!
 
 
Just a little shelf in the bathroom. My mom painted this adorable little Santa and we have it up somewhere in the house every year.
 
 
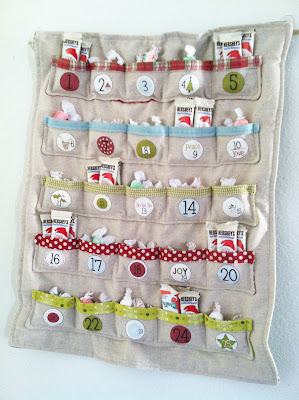
The countdown calendar is all stuffed and ready to go for this Saturday, the 1st of December. Each pockets filled with 3 treats, so we don't fight.
 
 
And this special corner...
 
 
Suprise suprise, my husband can play the piano! I really had no idea. I haven't heard him play before. I was practing my "Jolly Old Saint Nick" song when he came over to show me how it's really done. He was gracious enough to tell me how good I was doing for only 2 days worth of practice, but I admit I'm a little embarrassed to play in front of him anymore. I'll just have to get him to teach me what he knows. 


Sunday, November 25, 2012

Jolly Old Saint Nicholas...

 
 My newest crochet hat turned out so FUN! Don't you love it?! Now each of my kids have a new hat for the holidays. I'll have to get a picture of them all together.
 
Something new at our house...
 
 
It's on loan from my husbands family but I expect it will be here awhile. Long enough for the kids to start lessons after the new year. I've never taken piano lesson before. I'm hoping they come home and teach me all they learned. :) Last night Bruce taught me how to play "Jolly Old Saint Nicholas" and I've been playing it over and over again... probably driving everyone a little bit more crazy.

 
Our front room for the holidays! (yes that is an empty picture frame on the back of the piano, I'm still trying to decide what to put in it). We don't have a very large home and space is precious so I'm debating what, if anything, to hang above the piano. Any suggestions?
 
Ps. for the hat I used THIS pattern, and when I got to the end I just kept going and going and going...
 

Tuesday, November 20, 2012

Crochet Christmas Hats

 
Just stopping in to show you my latest... Christmas crochet hats!  
 
 
Of course the reindeer has got to be the cutest, but my oldest daughter wasn't so sure about wearing antlers so I made her the candy cane stripes. Since taking this picture I shortened the antlers an inch and I think it looks even cuter... not so floppy. I didn't really have a pattern, I used a collection of ideas from my "crochet" pinterest boards.
 
Up next, a Santa hat for The Boy! I'm hoping to have it completed in a few days. I do have a pattern for that one, and it's FREE! You can find it HERE. I'll let you know how mine turns out.


Wednesday, October 31, 2012

Thursday, October 11, 2012

Little Pumpkin Heads

 
I've gotten back into crochet this past week. These little pumpkin hats were a lot of fun to make while the days were getting cooler. I talk a lot about my love of summer, but October really is my favorite. It's gorgeous outside! Plus I made pumpkin bars today so my house smelled heavenly.
 
 
My littlest pumpkin head. Such a cutie!
 
 
For the hats I used THIS super simple FREE pattern. Loved it!
The stem I kind of just made up, and it shows... don't look to closely :)
For the vine I used THIS pattern. I could have made these little corkscrews all day, they were a lot of fun!


Some Autumn shots of my kids playing in the leaves...
 
 
This beautiful canyon was just a short 10 minute drive from our home.
 
 
"Every leaf speaks bliss to me,
fluttering from the autumn tree."
Emily Bronte


Wednesday, October 10, 2012

The Blanket Recovery Project

 
Our little C has a "B" that she loves more than anything in the world. About 5 years ago when I was brand new to quilting, I was sorely tempted by some cute fat quarters at the quilt shop I had just started working at.
 
 
I brought home my new purchase and set to work making a quilt for my brand new baby girl. Little did I know she would become very attached (I should have know, my other daughter has a "wiggy" that she still sleeps with every night). Had I known, I would have taken better care to do it right and I might not have ended up with this 5 years later...
 
 
Dreadful!
 
I pieced the top but never quilted it, just tied it. So all those seams started to come undone and lately I've been finding pieces of it around the house. It was time for a facelift. The experienced quilter in me now couldn't stand it any longer!
 
 
I let my daughter watch me do this to her beloved blanket because I wanted her to know it was still her "B". I assured her that "B" would be much happier when all this "itchy" stuff was off her. She even helped me and only cried once when I accidentally ripped a hole in the back. We mended it and got back to work. Then we went through my fabric stash and she picked out the fabric for her new blanket.
 
A full 32oz diet coke gone, a headache, very soar arms, and only 3 hours later... this is what we accomplished!
 
 
"B" before was fun to crawl inside and wear as a toga :)
 
 
"B" after! A beautiful, usable blanket again.
 
 
Our recovery project was a success (I was quite worried the whole time!). She has been carrying it around all day and told me that "B has never been so proud".
 
 
With her new facelift, B might just make it to college someday!


Monday, October 8, 2012

My Favorite Recipes: Soft Sugar Cookies


You know those long hours of waiting until the sun goes down on certain holidays... Halloween, Christmas Eve? The kids are going nuts with excitement and you've used up every good idea you had earlier in the month. That's when I like to break out this recipe for these super soft and delicious sugar cookies. They take awhile to make, well at least they don't come from a box, and the kids can take their time decorating them. It eats up a couple hours from start to finish in our home. And they taste so very good. They turn out a lot like those Lofthouse sugar cookies we love so much! There is a reason I save this special recipe for holidays, I eat way to many!
 
Soft Sugar Cookies
 
1 Cup Butter or Margarine, room temperature
2 Cups Sugar
1 Cup Sour Cream
3 eggs
1 tsp. Baking Soda
1 tsp. Vanilla or Almond Extract
6-7 Cups Flour
 
Cream the butter and sugar together. Add the sour cream and mix. Add the eggs, mix. Add the baking soda and flavoring and mix. Add the flour two cups at a time, mixing after each addition. It is best to refrigerate the dough before cutting.
 
Roll out on a lightly floured board. Keep the dough about 1/4 inch thick. Cut with cookie cutters and put on a paper-covered cookie sheet. Bake at 325 for 8-10 minutes. Do not overbake! Do not let them get browned! Cool and then frost and decorate.


Thank you Grandma Franson for this yummy recipe and the family traditions!


Friday, September 28, 2012

A Wickedly Easy Little Pillow

 
I'm going to eat my words a little bit here. I've tried printing on fabric before and the freezer paper that I used jammed my printer and made me angry, so I suggested using heat n bond. But I decided to give it another try and it worked! Not sure what, if anything, I did different but this time it worked wonderfully.
 
So in order to create this wicked little pillow all I did was pick out a font on the computer and chose a Halloween word. Some other words I played around with were "spooky" "fright" and even "October 31". I liked "Wicked" the best.
 
Cut a piece of fabric 8.5 X 11 inches and a piece of freezer paper 8.5 X 11 inches. Adhear the fabric to the freezer paper by ironing it to the waxy side of the freezer paper. The freezer paper will stick to the fabric well enough to go through the printer but peel off cleanly after it's been printed.
 
 
Peel the freezer paper off the fabric. I trimmed up my fabric a little bit to the size I wanted my pillow to be. Cut a piece of fabric for the back the same size as your front.

 
Now sew the two pieces together and leave a little hole in the bottom to stuff your pillow. Stitch up your hole when you are finished.


Wednesday, September 26, 2012

FREE Halloween printables for your home

 
These fun printables make a huge Halloween statement in our home for very little money. The frames I gathered from around the house and the prints only cost a few dollars to have printed out. I love the way they look grouped together in our entry way!
 
 
I made one in blue as well. Not a very traditional Halloween color but it matches our living room perfectly.
 
 
You can download your own set of Haunted Home Printables on box.com...


Tuesday, September 25, 2012

Spider Web Table Topper TUTORIAL

 
Believe it our not this is a super easy table topper that makes a big impact. It's just strips cut at an angle to make that spider web look!
 
 
I made 2 sizes, one fits nicely on my table as a table topper and the other would make a prefect candle mat. It's easy to adjust the size of the spider web by adding more or less strips. I think my little googly eyed spiders are happy to have such a cool web to hang at :)
 
 
To start you'll need six 2 1/2 inch X width of fabric (about 44in) strips. Sew your strips of fabric together like you see I've done below. Press all your seems to one side.
 
 
Most quilting rulers have a 60 degree angle line on the ruler. Your going to use this line to cut out 6 triangles. Like you see I've done below, lay your long strips of fabric out on a cutting mat and line the top edge with the 60 degree mark on your ruler.
 
 
A little clearer picture of that 60 degree angle...
 
 
Now using you rotary cutter, cut one side of your triangle at a 60 degree angle.
 
Now turn your ruler and line up the 60 degree line with the side you just cut. (see picture below) As you cut your second triangle you'll notice now that the triangle is flipped so that the longer bottom of the triangle (black with bats in my case) is now the point and the green circles will be the longer bottom on the triangle. See the next picture after this one if that seems confusing...
 
 
Cut out 6 of these triangles. If you are using 2 inch X WOF strips then you should be able to easily get 6 triangles. If you increase the size of each strip you'll need to increase the length of each strip. For instance, I wanted a larger table topper for my dining room table so I increase each of my 6 strips from 2 inches to 4 inches, but then I needed twice as much length so I ended up sewing two strips of fabric together end to end to make them long enough to get 6 triangles.
 
 
Lay your triangles out like you see I've done in these pictures. Start by sewing together the 3 top and then the 3 bottom.
 
 
Now sew the top 3 and the bottom 3 together in the middle.
 
 
Open it up and press and you'll have something that looks like this...
 
 
You can now quilt and bind your table topper using your favorite method. This is a perfect project to practice quilting yourself on your own machine. See THIS POST for tips on how to do that.
 
 
As you can see I made 2 different sizes. For the smaller size I only used 4 strips instead of 6. Make sure that you use an even amount of strips (4,6,8...). If you use an odd number you will end up with a middle strip that doesn't alternate when you rotate each triangle.