Pages

Friday, March 30, 2012

"Grass" Easter Basket Tutorial


I made this cute Springtime "grass" basket the other day to hold my very favorite candy in the whole wide world; Cadbury Mini Eggs. I eat so many bags of these this time of year, it will be amazing if I can fit into my Easter dress next Sunday. Maybe I'll be more motivated to leave them in the candy dish with such a cute display... maybe.

To make your own grass candy basket, cut out your pieces from green felt...
One 5 inch square
4- 5" x 3" pieces
4- 5" x 4" pieces

Lay your pieces out as shown below. Place your shorter side pieces on top of the larger ones.
You'll first sew all 4 of your sides together to make a square (without the bottom)...

Next you'll sew the bottom of your basket to the sides. Make sure you pin well.
Now turn your basket right side out...
and trim your grass.
It's a little floppy, even though your felt does have some thickness to it. I just hot glued a cute pink ribbon all the way around and that helped keep it more stable.
Now you can fill it with your favorite Easter treats. Because it's fabric you'll probably want to either line it with something like parchment paper or perhaps just set a pretty glass bowl inside, especially before adding anything sticky!

Tuesday, March 27, 2012

Family Life

It's science fair time at our house. For their project the kids decided they wanted to find the perfect chocolate chip cookie recipe (sounded like a yummy project to me!). So we have been busy making, and tasting, LOTS of cookies! According to the results of all of our taste testers (grandmas, grandpas, aunts and uncles, cousins, neighbors, and best friends) here is our recipe for the best chocolate chip cookie...

1/2 cup of granulated sugar
1/2 cup of packed brown sugar
2/3 cup butter (the clear winner over margarine)
1 egg
1 1/2 cups flour
1/2 teaspoon baking soda (I liked the melt in your mouth of baking powder... I lost though)
1/2 teaspoon salt
1 package of milk chocolate chips

Heat oven to 375 degrees. Mix both sugars, butter, and egg in a large bowl. Stir in flour, baking soda, and salt. Stir in chocolate chips. Drop dough by rounded tablespoonfuls onto an ungreased cookie sheet. Bake until light brown, 10 to 12 minutes.

A little something else the kids have been working on...
Their own embroidery projects.

And finally this project actually comes from a post last year, but I wanted to revisit it in time for Easter. It's a fun way to use up colored egg shells from all those left over Easter eggs.

Egg Shell Mosaics...

After you've made all the egg salad you can handle :) gather up your colored egg shells and have the kids decorate some projects for their rooms. I purchased these inexpensive little mirrors for them to decorate. Picture frames would also be cute!


Monday, March 26, 2012

Kid Craft, Mushroom Fairy House

Made from a left over plastic bowl and paper cup. Make a bunch and set up a tiny village outside on a sunny Spring day. My girls had fun decorating the outside and insides of the cups with crayons for the fairies. Sweet and simple.


I picked up the bowls and cups at the dollar store. 8 little houses for 2$! We attached the bowl to the cup, as well as the little mushroom spots, with glue dots.

Thursday, March 22, 2012

For Your Quilting Space...

Have you been doing some Spring cleaning around your home lately? I hung some new curtains in the living room and took the time to clean my window blinds. They were so dirty!

After your cleaning is all done, why don't you add a fresh new piece of art to your home... Quilt Subway Art!

Just click on the picture to make it larger, right click on your favorite color subway art, save to your computer and you can either print it off right there or send it to your photo developer to have it done.
Enjoy!

Tuesday, March 20, 2012

Shopping

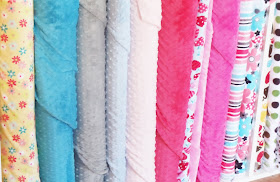
I ran into my local quilt shop (Pine Needles) the other day to grab a couple things.

(My tiny purchase for the day. I couldn't leave without this yummy charm pack though!)

I thought you'd like to see how fresh and pretty everything looked for Spring...


I'm lucky enough to be within a 30 minute drive of at least 8 (counting off the top of my head) adorable quilt shops. Of course THIS ONE has got to be my favorite (probably has to do with working there for 4 years). The sweet ladies at Pine Needles linked to my Scissor Tutorial yesterday, and today they have up a free pattern to a super sweet pillow. You can check out their fun blog HERE!

Monday, March 19, 2012

3 Pocket Scissor Case Tutorial


I've got a new tutorial for you to start your week off with, this fun scissor case! The best part is how it's made... by folding your fabric to create the pockets! Super quick and easy.
When you're done you'll have 3 pockets to hold your scissors in; 2 in the front and one on the back...
So let's get started!
The first thing to do is gather your supplies. You're going to need 2 pieces of cute fabric cut 8 1/2 by 11 inches, a piece of fusible interfacing (I used Pellon 808 Craft Fuse. This will give your fabric the strength to hold your scissors) and some scraps of felt and a button for your flower.
Cut your interfacing to 8 1/2 by 11 inches, to fit the back of one of your fabric pieces. Iron it on following the manufactures instructions.
Next you'll want to lay your two fabric pieces right sides together, as shown below...
You are then going to want to make the rounded top. To do this you need to start by folding your fabric in the shape of your scissor case. Because I think it is so much easier for you to see this step, rather than have me try to explain it, I've made this diagram below to show you how to fold your case (I just used a piece of double sided scrapbook paper to demonstrate this step, you'll use your two pieces of fabric, right sides together)
I hope that's clear! You should now have a piece that looks like mine below. You'll notice that along the top edge I drew a curve. You are going to cut along that curved line in your next step.

I cut along my curved line to make a rounded edge for the top of my scissor case...
Open your scissor case up again and it should look like this... (I lifted up one corner of my fabric just to show you I still have my pieces right side together)
At this point you can pin all the way around if you like. Start to sew your two pieces together. Don't forget to leave a small hole to turn your project right side out!
After you have sewn all the way around, turn your project right side out through the small hole. Press it flat with a hot iron.
You are then going to repeat your folding process from above...
All neatly folded. You can iron this to keep your folds nice a crisp.
Now top stitch all the way around your scissor case. It is at this point that I made sure to catch my turning hole on the side of my scissor case in my top stitching to close it up.
And there you go, all finished! A project so easy you can even have a little "helper", just like I did!
For that special touch, add a little flower out of felt and attach to your case. There are lots of tutorials online for felt flowers. You can find my favorites HERE.

Thursday, March 15, 2012

Kiss me... anyway


We're not Irish. My husband's mostly Scottish and English (pretty close, but not quite) and I'm a bit German and a bit Native American and who knows what else. I really wouldn't be surprised to find some Irish in the family tree somewhere, but not enough to get excited about.

I don't like to get pinched though, so I better wear some green this Saturday. And I'll probably hide some gold coins around the house for the kids to find. Maybe I'll make some green pancakes. It sure would be cute if we set up a little leprechaun trap the night before for the kids. Come to think of it, we do have some redheads in the family. But we're not Irish, so we probably won't do much for St. Patricks day this year...

New Look

What do you think of my new look? I'm liking it quite a bit. I probably change the look of my blog too often, but I come across all these fun blogs and think "Ooo, I want mine to look like that!". But this design I like. It seems to fit my style. Simple and sweet (not always my personality, mind you, my style...) Anyways, let me show you around a bit!


You'll notice up above there are some new pages labeled "Home, About Me, Finished Quilts, Printables, and Pajama Pants Tutorial"
I added the Pajama Pants Tutorial page because that is by far my most popular. Check out the rest of them. I especially like the Finished Quilts page, it's rewarding to see them all in one place. I have a few more quilts hanging around my home, maybe I'll add pictures of them too, in time.


On my side bar I have links to my Pinterest, Twitter (I'm new to Twitter as of today so there is not much there yet) and Etsy sites. There is also a button for you to share and a link to all my post labeled "tutorials".


Well, that's about it. I'm proud to say I designed it all myself. I found a fantastic little shop called Delicious Scraps where all the adorable kits are only .99 cents! This is where I got all my elements (the background, cute little birdy, ect...). Lot's of little freebies too! I posted their button on my sidebar, so you can go check them out.

Monday, March 12, 2012

Budget Birthdays, Swim Party Printables

I like to throw parties for my kids, but I'm always on a budget. Part of being a stay at home mom I guess. Actually, I'm not so sure... I think I'll always be thrifty, no matter how many millions I plan to make someday :)

While planning my daughters 8th birthday I searched from some free "swimming" party printables and came up with nothing. I found some really cute things for really good prices on etsy, but I wanted free, I was already spending enough to get everyone in the pool.

(pay no attention to my ugly cupcakes)

I decided to get what I wanted, I needed to make my own. I'm pretty sure my recent purchase of Photoshop has paid for itself by now. My printables are simple, but they are also free, and I think they're still pretty cute.


Not such a great picture of my daughter at the pool. We were having too much fun to bother much with the camera.


So here they are, a set of simple but cute swimming/pool party printables for you to use as you please. Of course I would love it if you'd link back to me if you post on your blog. And please use these for your personal use only. If I find they are being sold, I'll just let everyone know where you can find them for free! :)

You should be able to just right click on these, save them to a file, reopen them in a word document, photoshop, paint, something of that sort and print. If that doesn't work for everyone, please let me know and I can upload them to a site like box.com. Also, as for right now, I don't have a boy version but it's something I would be willing to make if I have enough requests.
cupcake toppers (I just taped them to some toothpicks)
Water bottle labels (I wrote everyones name on their own water bottle lable to take to the pool)
Birthday banner (you could print out multiple sheets for a longer banner. Attach with cute ribbon)
Bubble favor labels (Walmart had a pack of 8 bottles of bubbles for 2.50$. Very budget friendly!)

I'm thinking I'll make Budget Birthdays a recurring theme on my blog, probably about 4-5 times a year (we have 5 people in our family, but I don't see myself making my own "Happy 33rd Birthday" printables). Maybe more for holidays and things. Let's see how many cupcake toppers I can come up with!